
Workbook Share Wizard
The wizard release workbook leads you in several steps to the finished EasyMap Xplorer map, which you can view in your browser.
Most of the settings are taken from this workbook. Please also note the section Information for the creator of maps.
Login to EasyMap Xplorer Portal
In order to release the workbook, you must first log on to the EasyMap Xplorer server with your access data. Select the server on which you want to publish the workbook. This can be the EasyMap Xplorer Cloud Service (https://easymap-xplorer.de) or a company owned server.
EasyMap Xplorer Cloud Service
In the first dialog box, you are asked for the logon information for the EasyMap Xplorer portal. To log in, click Next and you will be redirected to the login window.
If you are not using your own server, you can use our EasyMap Xplorer Cloud Service. There you can choose between different login procedures:
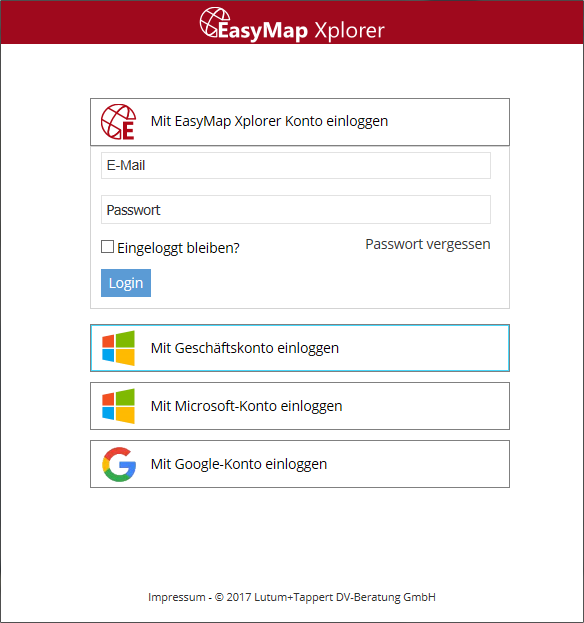
- EasyMap Xplorer Account
- business account
- Microsoft account
- Google Account
These login data are saved for the next release of a workbook.
The credentials depend on which server you are using. If you have your own server, you may be able to log in with your Windows login, in all other cases you must enter the special login data for the EasyMap Xplorer server here.
If you use the Windows login (business account) for login, no further settings need to be made here. In this case, however, your administrator must unlock you to use the server.
Delete login information
Click Login Information Delete to delete previously specified login information and log another user in.
Create free trial account
If you are not yet registered as a user on the server, you can create a test account here. Further information can be found here.
Note: If you click Next without entering valid credentials, you will be prompted to enter them again. Otherwise the wizard cannot be executed any further.
Publishing mode
In this step, select whether you want to upload a new workbook, create a new workbook with a template, or replace an existing workbook.
- New - Create a new workbook,
- New - using a template - Create new workbook / use existing workbook as template
- Refresh - Update existing workbook
The last two options open another window, in which all workbooks from the EasyMap Xplorer portal are listed. These are sorted by category as well as by personal or company-internal workbooks. Only the maps for which you are authorized to edit or delete are listed.
You have decided to replace an existing workbook. Specify here which of the workbooks already on the server is to be replaced.
Please note that when replacing workbook, the settings of the already uploaded workbook are compared with the settings to be replaced. This can result in different settings in the dialog Set Contents.
Settings
Here you define some additional information to be displayed in the context of your map in EasyMap Xplorer. You can also edit this information later in the EasyMap Xplorer portal.
If you replace an existing workbook, the specifications are already preset with the settings of the workbook to be replaced.
|
Title |
The title is used in EasyMap Xplorer as a heading, e.g. in the map catalog, in the map view or in the content window. |
|
Description |
A description is useful to provide the viewer with information about the workbook. Here you can, for example, describe the contents of the workbook, specify sources or insert further links. See Format descriptions for how to format the text you type or insert links. |
|
Specify here which user group the workbook may retrieve.
|
|
|
Edit/Delete permission |
Specify here which user group the workbookn may edit or replace in addition to viewing.
|
|
Category |
Categories are used in the EasyMap Xplorer portal to sort the various workbooks in the map catalogue. Create a new category or assign the workbook to an already existing category.
|
|
Preview |
In the preview you can see the map sheets available in the workbook. The preview image you select here is displayed in the EasyMap Xplorer in map catalog. You can select another map using the two arrow buttons below the preview image. The ... button allows you to select another file instead of the map as a preview graphic - e.g. your logo. |
 A click on the button shows you all persons who are in the respective group.
You can use HTML commands for the description field of a published workbook and for displaying data in the Info window in EasyMap Xplorer. These are later converted into corresponding displays or hyperlinks in the browser. These columns can also be created via Calculations in EasyMap.
The description field has some common formatting for you as buttons. Simply select the text you want to format and click the H1 button to highlight the text as the first heading.
| order | Description |
| <b></b> | Text formatting Bold |
| <u></u> | Text formatting Underline |
| <br></br> | NewLine |
| <p></p> | Paragraph (paragraph) |
| <img src=“url“></img> | Image |
|
Example: <img src=“http://www.easymap24.de/images/easymapeditionen.png“> </img> |
|
| order | Description |
| <h1> + <h2> + <h3> | Headings with different formats |
| <ul> | Disordered list |
| <ol> | Numbered list |
| <li> | list entry |
| order | Description |
| <a> | link |
|
Example: <a href=http://www.geomarketing.de/ target="_blank">Geomarketing></a> |
|
Click Advanced Settings to configure the contents displayed on the map in EasyMap Xplorer.
